MURIDEO
  • Home
  • Products
    • Seven Series >
      • The 8K Seven Generator
      • The Seven Generator
    • Six Series >
      • 8K Murideo Pair: Ultimate HDMI Testing Set
      • 8K SIX-G Generator
      • 8K SIX-A Analyzer
    • 8K Fox & Hound: HDMI Troubleshooting KIT
    • Murideo HDBaseT Testing
    • Monitors >
      • 4K Dual Screen Field Test Monitor
    • Acoustic Calibration Kit
    • Milwaukee Packout Case
  • News
    • Blog
    • Newsletter >
      • 2023 >
        • Q1 2023
      • 2022 >
        • Q1 2022
        • Q2 2022
        • Q3 2022
      • 2021 >
        • June 2021
        • April 2021
        • March 2021
        • February 2021
        • January 2021
        • December 2020
  • Resources
    • HDMI 2.1 Bandwidth Calculator
    • HDMI Data Rate Charts >
      • Data Rate Chart
      • FRL Data Rate Chart
    • A/V Glossary
    • Loyalty Programs >
      • Upgrade Program
      • Shield Program
    • Videos
    • Test Pattern Library
    • Product Training >
      • Calibration Training
      • Fox & Hound Training
      • MSTest Pro Training
      • SIX-G Training
      • SIX-A Training
      • SEVEN-G Training
  • Support
  • Firmware
    • 8K SEVEN GENERATOR
    • 8K SIX G GENERATOR
    • 8K SIX A ANALYZER
    • 8K Fox & HOUND
    • SEVEN Generator
    • SIX G Generator
    • SIX A Analyzer
    • Fox and Hound
    • MU-M4SOL
    • Windows Drivers
  • Contact
  • Buy

No HDR?

10/11/2019

0 Comments


So you want HDR, but it's not displaying on your TV or Projector? This guide will walk you though troubleshooting this issue. 

Picture
Picture
​One of the most common issues that integrators have today is not being able to trigger HDR on a display. This can be frustrating, especially when it seems like all of the stars are aligned and everything in the system is HDR capable. Here are some tips on system setup and troubleshooting that will help you in case you run into this issue.
 
In the following scenario we are looking at this system:
UHD Blu-ray Player --> AVPro Edge Matrix Switch --> AVR --> Display
 
Some tips before you start troubleshooting:

  1. Be sure that ALL devices in the system are 18Gbps capable and have the most up to date firmware.

  2. Be sure that all devices are configured correctly for 18Gbps. This includes ensuring that you are using the correct input and output on each device and checking the setup menus for things like HDMI Deep Color, UHD Color, or HDMI Enhanced. Each manufacturer does things a little differently so be sure to check the owner’s manual for specifics.

  3. TEST ALL HDMI CABLES BEFORE INSTALLATION. Just because the packaging says 18Gbps doesn't mean that the cable is functional. Most HDMI cables are mass produced, and it is not uncommon for "budget" HDMI cables do be DOA or have some type of issue. Also, a cable that passes 18Gbps at 2 meters may not pass 18Gbps at 5 meters even though the cables are from the same series or manufacturer. TEST TEST TEST! Click here for instructions on how to perform a cable test with Murideo HDMI test equipment.

  4. If you are playing a disc, be sure that you put in the UHD disc and not the HD disc. Most UHD movies include both versions so it can be confusing.

  5. If using Netflix, be sure that the associated account has been upgraded to Premium. This must be done from a web browser.

  6. EDID management plays a big role in troubleshooting these types of issues. Be aware that every device with an input has an EDID. It is essential that you understand how EDID works and how to manage it within each device in the system. For more information on EDID click here
 
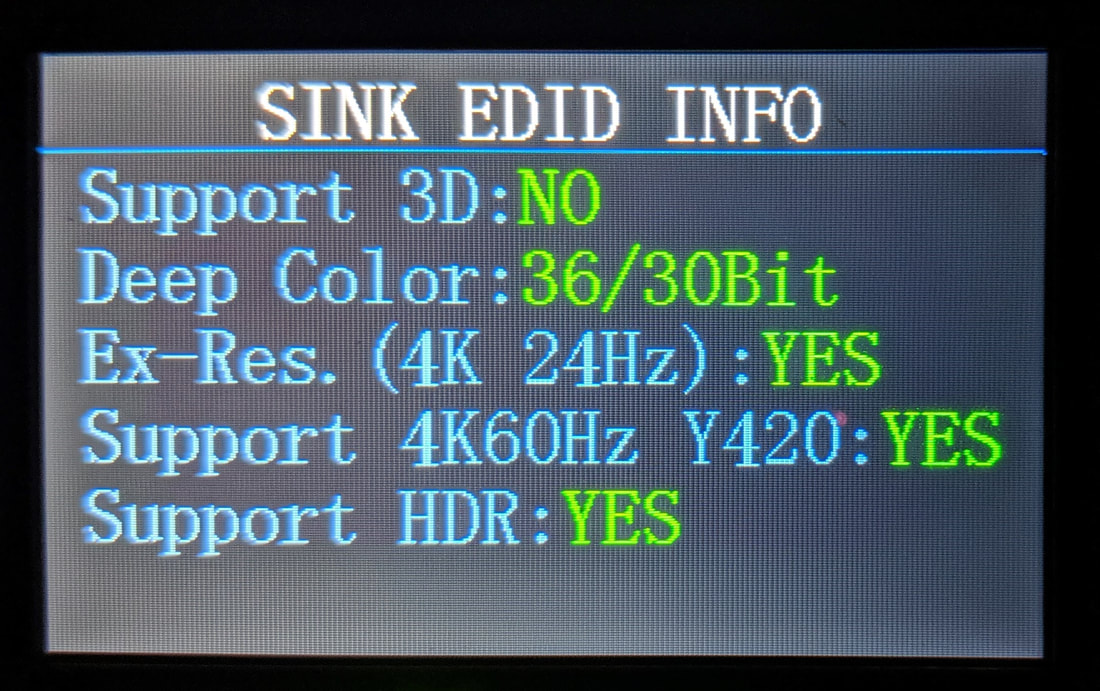
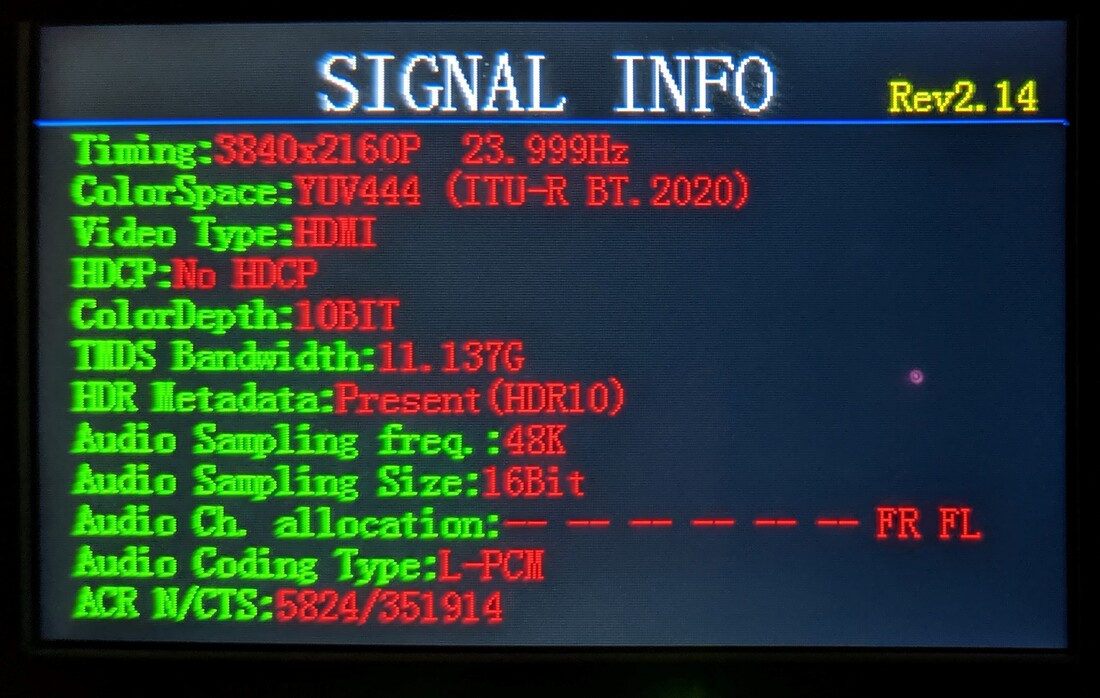
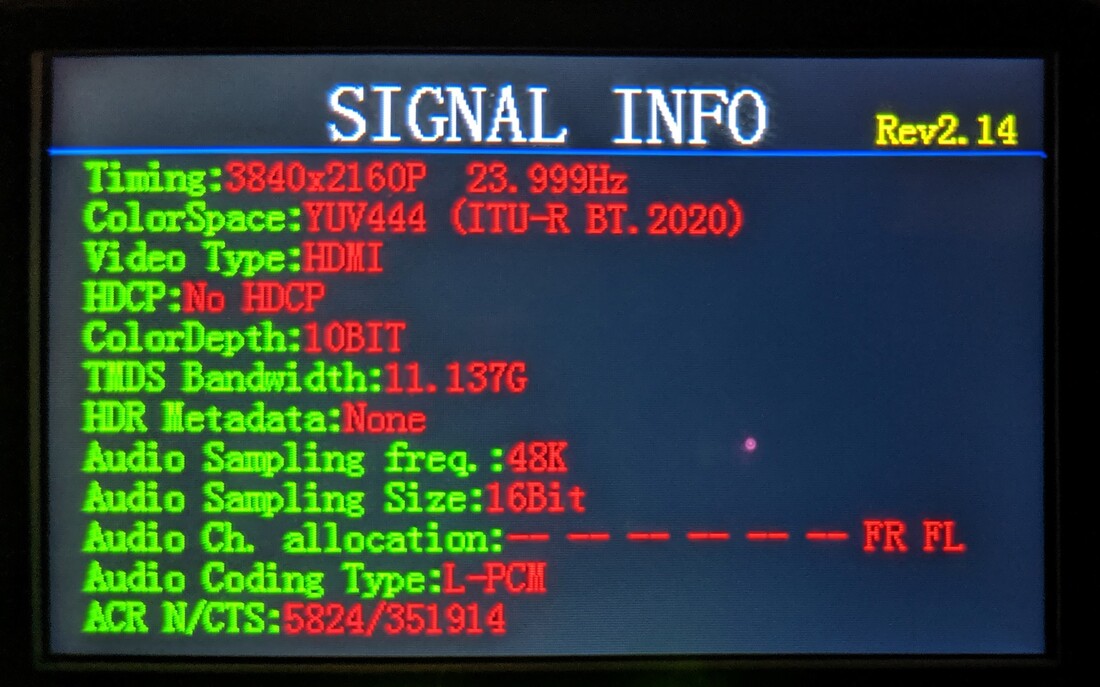
How to troubleshoot for "No HDR":
 
NOTE: Conduct these troubleshooting tests with either the Murideo SIX A and G or the Fox & Hound Kit. This guide is written for the SIX A & G Test Suite, but the process is almost exactly the same with the Fox & Hound Kit. Always have a known good 18Gbps HDMI cable in your kit. You will use this for testing different components in the system.

Testing the source:
  1. Play HDR content from the source
  2. Connect the HDMI analyzer to the output of the source
  3. Look for an image to appear on the analyzer's LCD screen
  4. Once the LCD screen is showing the source, press "OK" (Six-A) or “Info” (Fox & Hound) on the analyzer
  5. Look for the HDR metadata flag to say "Yes".
  6. If it does, then the player is set up correctly. If it does not, confirm that the player’s output is set correctly for HDR
  7. Test the original HDMI cable for 18Gbps compatibility
  8. If the cable tests out and shows zero errors, it’s time to move on to the next component downstream. In this case that would be the Matrix Switch
  9. Some Blu-ray players have 2 HDMI outputs and both may not be 18Gbps capable. Be sure that you are using the correct output on the player
Picture
Picture
Picture
Testing the matrix switch:
  1. Connect the HDMI signal generator to the input on the matrix switch (be sure to use the same input that the source is plugged into)
  2. Generate an HDR test signal by setting the generator’s output to 2160p24, YC444, 10bit, WCG, HDR
  3. Confirm that the TV is receiving an HDR signal
  4. If it is, then the problem lies in the source. Confirm the output of the source is set correctly for HDR and that you are playing an HDR capable disc
  5. If the TV is not receiving an HDR signal, then check the EDID on the Matrix Switch. You can do this with the HDMI signal generator or on the Matrix Switch itself (on the front panel or with the web interface). There are several built in EDIDs in the matrix switch. You can use one that calls for 4k/HDR or you could copy the EDID from the TV

    NOTE: Before copying the EDID from the TV to the matrix switch, confirm that that TV has the desired EDID. To do this follow these steps:
  1. Connect the Six G directly to the TV in the same input that you are using during normal operation
  2. Confirm that the input is 18Gbps capable and that it is configured (see step 2 in the intro)
  3. Using the generator, confirm that the TVs EDID is indeed asking for an HDR signal
 
If the source is outputting an HDR signal, the HDMI cable connecting the blu-ray player to the matrix switch tests out, and the matrix switch’s EDID is correct, then the problem should be solved. If not, confirm that the HDMI cable that connects the matrix switch to the AVR is passing 18Gbps. If it is not, replace the cable. If the cable tests out and shows zero errors, it’s time to move to the next component downstream. In this case that would be the AVR.
 
 Testing the AVR:
Since the AVR has an input and an output you will have to test both.
  1. Connect the generator to the input on the AVR that you will be using during normal operation
  2. Connect the output of the AVR to the analyzer
  3. Generate an HDR test signal by setting the generator’s output to 2160p24, YC444, 10bit, WCG, HDR
  4. Using the analyzer, confirm that an HDR signal is passing through the AVR. If it is, then move on to the display. If it is not, then follow these steps:
    1. Check the AVR’s EDID with the generator. Confirm that it is asking for an HDR signal. If it is not, check that the AVR’s input is configured for HDR (look for settings such as HDMI deep color, UHD color, etc. Each manufacturer does things a little differently so be sure to check the owner’s manual for specifics).
    2. Confirm that the HDMI cable that connects the AVR to the TV is passing 18Gbps. If it is not, replace the cable. If the cable tests out and shows zero errors, it’s time to move on to the next component downstream. In this case that would be the TV

Testing the TV:
At this point you have tested every other component and every HDMI cable in the system. If you are still not able to get HDR to the TV, follow these steps to test it:
  1. Play HDR content from the source
  2. Install the HDMI signal analyzer at the end of the signal chain in place of the TV
  3. Once an image appears on the screen, press “OK” on the Analyzer (SIX-A)
  4. Look for the HDR metadata flag to say “Yes”. If it does:
    1. Unplug the HDMI cable from the analyzer and back into the TV
    2. As long as you are using the correct input for 18Gbps and the input is configured correctly the problem should be solved
  5. If the HDR metadata flag says “NO”:
    1. Verify that you are plugged into the correct input on the TV for 18Gbps
    2. Verify that the input is configured correctly for 18Gbps  

In some cases, you may be dealing with an HDBaseT Matrix Switch. Here are some tips from HDBaseT that will endure a successful installation:
​
  1. LAN is thy cable
    HDBaseT runs on a regular LAN cable (Cat5e or above) so any best practices regarding Ethernet installations also apply here. Cable performance is defined by the quality of the cable, the distance of the connection, the handling of the cable, and the video resolution expected. A rule of thumb is that the higher resolution, the better the cable should be. The same goes for distance. The cabling infrastructure in any project is likely to be around for a long time – it should last longer than any other component in the network, and choice of cable should take into consideration new applications, additional users and potential expansions of the whole system. WE CANNOT GUARANTEE PERFORMANCE UNLESS USING CAT6a OR HIGHER.

  2. Thou shalt not untwist your wires unnecessarily
    There is a reason that the wires are twisted: it cancels out electromagnetic interference (EMI) from external sources and crosstalk from neighboring conductors.  When terminating the cable, make sure not to untwist more than half-an-inch (and preferably a quarter-of-an-inch) from the point of termination, and remove as little of the sheath as possible.

  3. Thou shalt handle your cable with care
    LAN cables are fairly resilient. Yet, any rough handling, such as tight tie wraps, clamping or stapling can damage the cable, compromising performance or even preventing signal transmission. Tie cables loosely with appropriate cable wraps, and make sure to use appropriate cable support systems when too many cables are involved, such as trays, carriers or J-hooks. If pulling cables is necessary, make sure not to pull too hard because that also may cause pairs to untwist and degrade performance. Cable physical protection safeguards the integrity of data transmission.

  4. Thou shalt not overbend your cables
    Another important issue for cable integrity is the bend radius.  Bend radius is the inside curve of the cable during and after installation.  It is best to keep the minimum bend radius at least at four times the diameter of the cable – that means that the cable should not be bent below that radius, so as not to damage it and compromise signal transmission.  Overbending may loosen or otherwise modify the wire twisting and increase susceptibility to external noise and near-end crosstalk within the cable.

  5. Thou shalt keep your cables away from power sources
    Cables should be kept at a distance of at least 12 inches from power cables.  In an environment prone to high EMI, it is best to use shielded cables.  Most Cat5e cables are unshielded, which makes them more flexible, durable and inexpensive.  But they are also more susceptible to EMI. 

    If using unshielded cables, keep them away from any source of EMI such as other cables, transformers and light fixtures. In high RF environments, it is best to use shielded cables. 

    The same applies to shielded connectors. In a shielded connector, the signal pins are surrounded by a metal shield, and further reduce electromagnetic interference. Shielded connectors provide a better fit and therefore better performance.

  6. Thou shalt mind your distances carefully
    HDBaseT delivers the 5Play feature set over 100m/328 ft.  One of the factors that affects distance is the quality of the cable used, the working environment, and the video resolution expected. Higher quality cable will keep the signal better than low quality cable over distances.  A noise free environment will deliver better performance over the distance than a noisy or EMI-prone environment.  Some HDBaseT equipment allows for Long Reach connectivity – 150m/492ft – for lower resolutions of 720p.

  7. Thou shalt not use patch cords unnecessarily
    If possible, avoid patch cords or cables altogether, as every connection introduces losses in the transmission. If absolutely necessary, make sure to use less than two per cable run and keep each less than five meters from the end.

  8. Thou shalt terminate carefully
    ​One of the advantages of HDBaseT’s using of LAN cables is that they are easily field terminated.  That means there is no need to pre-measure cables and bring all the setup ready ahead of time, saving time & money.  Make sure to use proper equipment for termination, such as cable strippers, electrician scissors, and crimpers.  Also, make sure that both ends of the cable are wired according to the same scheme, either T568A or T568B. Never use both in the same installation. It is also recommended to check with HDBaseT manufacturers which scheme their products are optimized and equalized for, to take full advantage of the expected performance. 

  9. Thou shalt be thorough and test, test, test
    Testing is crucial to guarantee both cable quality and signal integrity.  Pre-testing can save hours and resources from troubleshooting any issue ahead of time.  During and after installation, a professional test equipment will check connections and transmission of the installed infrastructure, beyond broken or mismatched wires, but also any hidden issues that may cause interference or loss of signal.  Make sure to test every cable as it is installed and terminated, to identify individual problems as the installation goes.

  10. Thou shalt be organized
    Document and label all cabling components to facilitate any upgrades or expansions later, including diagrams. Remove any abandoned cables to prevent accidents or fire hazards.  Avoid routing cables through pipes and holes, which may limit additional future cable runs.​​

 There are many ways to troubleshoot a system, and with the proper tools and methodology you can track down problems in a minimal amount of time. Come up with a plan, take things one step at a time, keep track of what you have and haven’t tested, and if problems continue to persist you can always call our tech support department at 877-886-5112 or +1 605 274 6055 (Int'l).  
​​
0 Comments


Leave a Reply.

    Third Party Reviews & Articles

    SIX-G Generator
    • HDMI Corner: CEPro January 2016
    • CEPro BEST 2015
    • AVForums Review
    • Residential Systems
    • rAVe Europe
    • rAVe Pubs
    • rAVe Pubs (Video)
    • Tributaries e-Newsletter
    • AVMagizine.it
    • European Custom Installer

    Archives

    February 2023
    January 2023
    October 2022
    September 2022
    May 2022
    February 2022
    June 2021
    April 2021
    March 2021
    February 2021
    January 2021
    December 2020
    November 2020
    September 2020
    June 2020
    April 2020
    March 2020
    February 2020
    January 2020
    November 2019
    October 2019
    September 2019
    August 2019
    July 2019
    April 2019
    March 2019
    January 2019
    October 2018
    September 2018
    July 2018
    June 2018
    February 2018
    January 2018
    September 2017
    August 2017
    July 2017
    May 2017
    March 2017
    February 2017
    January 2017
    December 2016
    November 2016
    October 2016
    September 2016
    August 2016
    July 2016
    June 2016
    May 2016
    April 2016
    March 2016
    January 2016
    December 2015
    October 2015
    September 2015

    Categories

    All
    HDMI 2.0 Troubleshooting

    RSS Feed

© Copyright 2015-2022
Home
Contact Us
About Us
Careers

2222 E 52nd Street North, Suite 101, Sioux Falls SD 57104
+1 605-330-8491
info@murideo.com
​Terms & Conditions | Privacy Policy
  • Home
  • Products
    • Seven Series >
      • The 8K Seven Generator
      • The Seven Generator
    • Six Series >
      • 8K Murideo Pair: Ultimate HDMI Testing Set
      • 8K SIX-G Generator
      • 8K SIX-A Analyzer
    • 8K Fox & Hound: HDMI Troubleshooting KIT
    • Murideo HDBaseT Testing
    • Monitors >
      • 4K Dual Screen Field Test Monitor
    • Acoustic Calibration Kit
    • Milwaukee Packout Case
  • News
    • Blog
    • Newsletter >
      • 2023 >
        • Q1 2023
      • 2022 >
        • Q1 2022
        • Q2 2022
        • Q3 2022
      • 2021 >
        • June 2021
        • April 2021
        • March 2021
        • February 2021
        • January 2021
        • December 2020
  • Resources
    • HDMI 2.1 Bandwidth Calculator
    • HDMI Data Rate Charts >
      • Data Rate Chart
      • FRL Data Rate Chart
    • A/V Glossary
    • Loyalty Programs >
      • Upgrade Program
      • Shield Program
    • Videos
    • Test Pattern Library
    • Product Training >
      • Calibration Training
      • Fox & Hound Training
      • MSTest Pro Training
      • SIX-G Training
      • SIX-A Training
      • SEVEN-G Training
  • Support
  • Firmware
    • 8K SEVEN GENERATOR
    • 8K SIX G GENERATOR
    • 8K SIX A ANALYZER
    • 8K Fox & HOUND
    • SEVEN Generator
    • SIX G Generator
    • SIX A Analyzer
    • Fox and Hound
    • MU-M4SOL
    • Windows Drivers
  • Contact
  • Buy